Recruiting Insights Part 2: Mastering Your Interview

In the span of 4 months, I’ve been on both sides of the job application and interview process. First, I was the job seeker, sweating my way through the interview to secure a position as a (first time) manager. Then, with no time to even settle into the corner cubicle, I began the task of hiring an employee.

Being on both sides of the interview table in such a short time gave me a new perspective on (and understanding of) the whole “recruitment” process. Since then, I’ve been overwhelmed with the urge to share this new understanding with other job seekers. So in this two-part series, I’m going to give my take on how to help yourself, and your potential recruiter, through the application and interview process.

Last week, I talked about nailing your job application. This week, I’m going to give you tips on mastering your interview.

Mastering Your Interview

I don’t know about you, but the interview part of the job search meets my top two criteria for personal awkwardness: being the center of attention and talking about myself.

Needless to say, they’re a sweat and nausea inducing experience for me.

Because of that, I’ve developed a few tricks along the way to get myself through them. This week, I’m going to share some of those interview (survival) techniques that I’ve learned by being on both sides of that table.

The General Questions

It’s hard to prepare for the questions you may be asked during your interview, but it’s not impossible. The first thing you can do is fire up your favorite search engine and look up “standard interview questions” for the type of position you’re interviewing for.

While they may not be the exact questions you’re going to be asked, they’ll give you a good idea of what managers/recruiters are looking for these days.

Also, sit down and think “If I were hiring this position, what would I want to know?” Again, not an exact science, but it gets you thinking.

And while you’re thinking, write down some answers to those questions to study between now and your interview. You might be surprised at how that can help you feel confident and prepared.

The Strengths & Weaknesses Questions

The “What is your greatest strength?” and “What is your greatest weakness?” questions have been standard on every interview I’ve ever participated in. You can probably expect to hear them in some form in your interview too.

They’re also my least favorite questions. I’d rather memorize and recite the entire bloodline of the British royal family than try to figure out what I’m good at.

But, while they might be hated, they’re also a great opportunity to shine! Before I explore each one a little further though, let me throw in this little bit of advice:

Don’t be glib. Really think about your answers. And keep the answers related to the job you are applying for.

Strengths

I actually find this one harder to answer than the “Weakness” one. I think it has something to do with “tooting your own horn.” I don’t want to come across as an arrogant jerk or superwoman. But I don’t want to sound like I’ve got cooked spaghetti for a spine either.

So, strength question advice number one: Take a good, honest look at yourself and write down everything that you can even consider as a strength. If you can’t think of anything, talk to people who know you well and ask them what they feel your strengths are. You’ll be happily surprised by what they say.

Now go through that list with the position you’re interviewing for in mind. For today’s example you’re interviewing for a team leader position. Look at your list of strengths and highlight the ones that stand out as “leadership” skills. Let’s say your list includes: Extroverted, Time Management Skills, Good at Translating Tech Speak to Layperson Terms, etc.

Next it’s time to decide which item on that list is your greatest strength as it relates to the position you’re interviewing for.

I’m going to pick “extroverted” for this example. As an extrovert, you’re not shy, you can create a dialog with anyone about anything and you’re great about making even the shyest person on your team open up and share ideas in a group setting. So, your team building skills are excellent.

Now that you’ve got your greatest strength highlighted, circled and underlined, don’t forget to come up with an example of how you’ve used this skill, just in case you’re asked. Remember, “Chance favors a prepared mind.”

Are you ready to flip that coin and talk about our weakness and how we can turn it in to a second strength?

Weaknesses

Pick up your pad and pencil again. It’s time to make another list. This time, list out your weaknesses.

Remember, be honest, not glib. There are two reasons for this.

One, you want to pick a “weakness” that you can work some spin doctoring on and two, glib answers, such as “I tend to forget it’s time to leave!” are mildly annoying and can backfire on you. You’re trying to say “I get so focused on the task at hand that I lose track of time.” What they might hear is “I have no time management skills.”

If that’s a legitimate weakness, though, then say it in English. “I’ve been working on improving my time management skills by using lists and my calendar to make sure I stay on top of tasks.”

That answer is clear, positive and it shows that you know you have an issue, but you take steps to make sure it doesn’t impact your workload.

You can also try to spin a weakness into another strength. Let’s pick something from your list and work some magic.

You’ve reached the weaknesses question of your team leader interview, and during your prep you singled out being an “introvert” as your greatest weakness.

You tell your interviewers that, yes, you’re introverted, but that you find it can be a strength in a leadership position. You may not be the first person to speak up in meetings, but, by sitting back and observing the meeting first, you can read between the lines and help people express what they’re trying to say if they’re not getting their point across.

And since you tend to observe people more, you’re able to quickly pick up on personality traits as well as potential conflicts between different personalities, allowing you to divert those conflicts before they even happen.

Helping your staff express themselves as well as diverting conflicts before they even happen are pretty valuable skills for a weakness!

Just like the strength question, write down your answer and come up with an example, just in case.

Now, It’s Not All About You

Here’s a thought that helped me out immeasurably in interviews. “It’s not just about me!”

Sure, you’re being interviewed to see if you’re a good fit for the company with the skills to get the job done. But, you have to work there with these people. So don’t be afraid to turn the tables. While they’re studying you and dissecting your answers, study your interviewer.

Do you get any “vibes” that make you think “I’m not sure I could work for her” or “Wow, these guys seem pretty laid back!”

Listen to those vibes. It’s just as important that you feel like the company will be a good fit for you, too.

And when they ask “Do you have any questions for us?” go to town (reasonably, of course).

Come up with a short list of questions beyond the standard ones that address salary and benefits. Ask questions that will give you an idea of what they’re really looking for like “In the team leaders that have worked for you in the past, what qualities did those that ‘stand out’ in your memory have?”

This sneaky little question does double-duty. It gives you better insight into the qualities the interviewer is looking for and may give you a chance to clarify something earlier on in your interview (like your strength or weakness).

A Thought About the Domestic CEO

Are you re-entering the workforce after putting in some time as a stay-at-home parent? Do not let that cause you heartburn! Do you know why?

Think about any company. No matter what the company does, it has administration, operation, finance, and technology offices with teams to manage them all.

Now, think about your household. You also have administration, operations, finance, and technology to deal with and a team of one or two to handle it! You deal with logistics, discipline, time management, resource management, finance, etc. on a day-to-day basis.

So, brainstorm your home life. There are numerous examples daily of how you’ve overcome problems, negotiated a cease-fire, or allocated available resources to tasks at hand.

Wrap Up

The interview is a nerve-wracking experience for many, but with a bit of prep, you can sail through it pretty easily. Remember:

  • Don’t be afraid to “Google” some standard interview questions for the job you’re interviewing for. Having some answers prepared can help boost your confidence in the interview and relax you a little.
  • When it comes to the Strength and Weaknesses questions, be honest and not glib. These are questions that can help you outshine your competition.
  • If you can, spin your “weakness” into another strength. It may take some creative thinking, but it can be done.
  • “Interview” your interviewer. Turn the tables and make sure that the company and people you may be working for are a good fit for you.
  • You learn some necessary skills for the outside workforce as a Domestic CEO too. Brainstorm on how they can help you land that job!

Most of all, don’t give up! Like with the application process, the interview process is pretty subjective and depends on some ambiguous, magic combination of skills and experience. That perfect combination is out there for you, too!

Do you have interview survival techniques or advice to add for our fellow job hunters? Feel free to put them in the comments below!

*Disclaimer: The opinions in this blog post are mine and mine alone. They are not the opinions of my current employer or my managers (past and present). I just felt like sharing some ideas on the job seeking process from my perspective on both sides of it.

Recruiting Insights Part 1: Nailing Your Job Application

In the past four months, I’ve been on both sides of the job application and interview process. First, I was the job seeker, sweating my way through the interview to secure a position as a (first time) manager. Then, with no time to even settle into the corner cubicle, I began the task of hiring an employee.

Being on both sides of the interview table in such a short time gave me a new perspective on (and understanding of) the whole “recruitment” process. Since then, I’ve been overwhelmed with the urge to share this new understanding with other job seekers. So in this two-part series, I’m going to give my take on how to help yourself, and your potential recruiter, through the appl ication and interview process.*

Nailing Your Job Application

The Internet is full of great articles on constructing resumes, standing out from the other applicants, etc., so I’m not going to rehash that (I don’t think). Instead, I’m going to share some of the things I learned while reading through a stack of applications as a first-time recruiting manager.

Below, I’ve got my take on everything from reading the job announcements to what to include in your work history.

Let’s get started! First and foremost —

Read & Re-Read the Job Announcement. Then, Read it Again.

This one actually goes without saying, I’m sure. But I’m going to say it anyway. It’s probably the most important advice I can give you and is the driving force behind the rest of the advice in this post.

Let’s say you’re looking for a job as a “Widget Description Writer (WDW)” and you’ve got a list of jobs you want to apply for. Read those job announcements carefully to make sure you’ve got the main skills they’re looking for.

If the announcement lists WAN/LAN and TCP/IP experience first, with something about “writing” thrown in at the end, and you don’t know a USB port from a phone jack, don’t apply for it. You’re only wasting your time as well as that of the manager reading the application. And your time, sweat and tears are just as valuable as the manager’s! (Remember that.)

So, read the announcement carefully and make sure your skill set is compatible with the skill set they’re looking for.

Knowledge, Skills & Abilities – Use, But Don’t Abuse, This Field.

For me, in my role as “Recruiting Manager,” the “Knowledge, Skills & Abilities (KSA)” field is akin to the blurb on the back of a book. It gives me an idea of what I might find once I start reading through the job history of the applicants.

For my own part, I grabbed my stack of applications and my trusty highlighter and went through each one, highlighting everything relevant in my hunt for my new WDW. Those highlighted items were the things I hoped to find expanded on in the job history/work experience section of the application.

While marking up those applications with various shades of Neon, I noticed that some applicants listed everything they know, whether it was relevant to the job announcement or not (I’m talking throwing the neighbor’s kitchen sink into the thing), and others ignored the section all together.

The KSA field is your friend. And the recruiter’s friend. Use it, but don’t abuse it.

If you’re not applying for a position as a receptionist for a busy finance firm, there may not be a need to include the fact that you can operate a multi-line phone system while simultaneously operating one of those calculators that spits the paper out the back.

If you want to include every skill you have, just in case, at least put those most relevant to the position at the top of your list. (For the record, I fell into the “just in case” category in my own application.)

If You’ve Got it, Flaunt it!

If the KSAs are the blurb on the back of the book, then the job history section is the “can’t put it down until I finish this chapter” meat inside. And just like with a novel, the inside needs to live up to that blurb.

Back to my stack of apps. I’ve made it through the KSAs and both highlighter and fine-toothed comb are poised over the work history and experience section. What I’m looking for now is the experience to back up those KSAs.

If you’ve stated in your KSAs that you know various forms of widget description writing, you need to make sure that knowledge is backed up in the job history portion of your application. Recruiters like myself use that to prove to their managers that “Hey, this person has 10 years of experience writing about widgets!”

If you don’t write it down, recruiters don’t know that you’ve actually done it.

But what happens if you’ve spent the past 15 years getting paid to build rockets and your WDW experience is all “on the side?”

Use one of those “Previous Job Experience” slots and stick that in there! Just because you may not have gotten paid for it, doesn’t mean you didn’t work hard to do it. So don’t be afraid to say that you’ve freelanced as a WDW for the past ten years.

Show Your Stuff!

Do you have an online portfolio showcasing your Widget Description talent? Don’t hesitate to include that link in your application. Trust me, it’ll get viewed.

But don’t worry if you don’t have anything online. You can always to offer to email samples when you’re called to set up an interview. Or, at the very least, bring them with you. Work samples are invaluable!

On the flip side, don’t sweat it if you don’t have work samples. The interview will allow you plenty of opportunities to prove you’re the (wo)man for the job.

Wrap Up

I’ve read a lot of articles about recruiters spending only 5 to 10 seconds scanning a resume before making a decision on whether to interview or not, and that’s true for some recruiters. That’s what works best for them and there’s nothing wrong with that process at all.

But there are also plenty of recruiters out there who will go through each resume or application with a fine-toothed comb. Help yourself and the recruiters by:

  • Only applying for the jobs that match your skills (or at the very least, come really close)
  • Tailoring your application for that job
  • Including all of your relevant KSAs
  • Backing up those KSAs in the work history section (even if that work history/experience was volunteer work or “on the side”)
  • If applicable, providing a way for recruiters to see your hard work

Most of all, don’t give up. The selection process is really subjective and it all depends on some ambiguous, magic combination of skills and experience. That perfect combination is out there for you, too.

Come back next week for part 2 of this series where I offer insight from both sides of the interview. And as always, please feel free to share your own thoughts and insights in the comments below!

*Disclaimer: The opinions in this blog post are mine and mine alone. They are not the opinions of my current employer or my managers (past and present). I just felt like sharing some ideas on the job seeking process from my perspective on both sides of it.
What Do You Do When They Say “I Don’t Want to Read That”

A picture of a little boy pouting in a chair.
I don’t wanna.

Today’s blog post is more of a plea for advice than anything else, because I find myself at a loss.

You see, I’ve been blessed with two kids who love to read as much as I do.

Until now.

Up until last week, I’ve never had to beg, bribe or threaten either of my children to read a book.

Then, the beginning of school and the first reading assignment came along.

This year, for the “beginning of the year reading project,” the school assigned one book to all students rather then giving them a choice of books.

And it’s a book he hates. Which means he has absolutely no desire to read the thing.

Unfortunately for me, the boy and I share one very annoying trait: stubbornness.

Like me, if the youngest is uninterested in something, there’s very little in the world that can make him do it. While I didn’t outgrow this annoying trait, I did eventually discover that some things have to be done whether they’re interesting or not. It’s a lesson I’m now in the process of trying to teach a stubborn youngster.

The boy who finished the 7th Harry Potter book in less than a day has taken a week to read 110 pages. I’ve tried everything: orders, cajoling, bribery, threats. One or more of those have worked well in the past, but we’re still only 110 pages into the book.

He’d rather do dishes, by hand, than read this book.

He’s gone so far as to take a book from his personal library, with a cover similar to the “evil” one, to fool his stepdad and I into thinking he’s reading the assigned one. (Once we caught on, the imposter book got confiscated.)

So now I make a heartfelt appeal to you: When you’ve run against a similar situation with your children, how do you help them learn that whether they like it or not, they have to do it anyway?

Photo Credit: Karen Bristow

4 Reasons Why I Love yWriter

yWriter
yWriter – my new favorite novel-writing tool.

“Hi. My name is Karen and I’m a recovering Word addict. It’s been six months and ten days since I last worked on my novel-in-progress using Word. I’ve replaced my Word addiction with a yWriter obsession!”

To say I’m obsessed with yWriter is probably an understatement. I think my husband is on the verge of telling me that I spend more time with it than I do with him. So what is this thing that has my husband believing he’s a “Writing Widower?”

It’s a word-processing program designed and developed by novelist and computer programmer, Simon Haynes. While writing his first novel, he found himself struggling with large files of story data, and keeping track of chapters and scenes was beyond cumbersome.

Drawing on his programming background, where projects are broken into smaller “modules,” he developed a stand-alone word processing system that takes writing projects and breaks them down into the literary equivalent of a module; the “scene.”

I found this program years ago, but never used it. After reading “Outlining Your Novel: Map Your Way to Success,” by K.M. Weiland, I downloaded the current version and dug in. There was a slight bit of “What’s THIS tab do?” in the beginning, but it’s not a hard program to get the hang of. Now I love it! Below are four of the reasons why I now hug my monitor at the end of a daily writing session!

1. It’s a digital “Story Bible”

I’ll admit it; the concept of a story bible is new to me. Before now, I wrote short stories. A document or two to keep the highlights handy was all I needed. But now I’m tackling my first novel and I’ve found that I need to keep a lot more information at my stubby fingertips.

I started off with numerous folders and Word documents: Character Sketches, Setting Sketches, Plot Sketches, Summaries and a Synopsis. They were filed all nice and neatly. But when I needed to find out say, what color scales a particular dragon has, I had to hunt it down. My bad for making them three different colors in three different documents.

With yWriter, it’s all in one place. Does Hyram have black, red or gold scales? Instead of opening up half a dozen documents, I can find out with one click on the “Characters” tab.

There are also tabs for you to fill in information on Locations (Settings, in my mind), Items, Project Notes and Scenes.

Keep your characters and settings straight.
An At-A-Glance view of your scene's goals, conflict and outcome.
An At-A-Glance view of your scene’s goals, conflict and outcome.

2. Break your big project down into smaller chunks

Any writing project can be daunting, whether it’s a 150 word essay to a 150,000 word super novel. As with any task, breaking it down into smaller chunks helps you focus, feel accomplished and not have a full-blown panic attack.

In yWriter, each book is a “Project”. You can then break that down into Chapters and further into scenes. Your “Scene Screen” has a Word-like word processing section for your actual typing. Above, though, are another selection of tabs, to help you keep your scene straight. Details, Characters, Locations, Items, Notes, Pictures, and Scene Goals are a click away.

So when you’re typing away and you suddenly find yourself asking “Wait, is it the Priest or the Scholar that shows Hyram the secret map?” click on the characters tab and see which characters you’ve indicated are in this scene. If that doesn’t help, check your details or notes tab.

Need to re-arrange your scenes? Just drag and drop them in the order you want! When you’re ready, you can export your chapters and scenes out into a manuscript (which I haven’t done yet because, honestly, I’m still wrangling Chapter 1 into shape).

No need to search for files in the middle of a writing session. The information is all a tab away.
No need to search for files in the middle of a writing session. The information is all a tab-click away.

3. Make and keep a writing goal

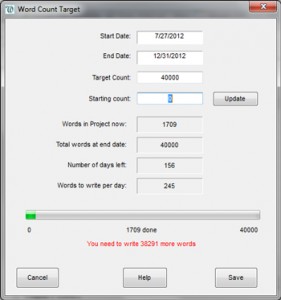
I found this to be a nifty tool. Under “Tools” is something called a “Daily Word Count Target”. When you open it up you can enter in a Start and End Date as well as a target word count. Then it calculates how many words per day you have to write to meet that end date. It also keeps track of how many words you’ve written and how far you have to go. For those of us who like visual indicators, there’s even a progress bar.

Create and keep track of your writing goals and daily word count.

4. It’s Free

What can I say? Even with a day job, I still pretty much fit into that “Starving Artist” category. You can “register” your copy, but it’s not required at all. The disclaimer on Spacejock.com says:

“You won’t pay anything to download yWriter, and the software contains no adverts, unwanted web toolbars, desktop search programs or other cruft.”

I certainly haven’t seen anything to indicate otherwise. No computer wonkiness, no pop-ups, no ads. Just a nifty tool that has helped me reign in an out of control story.

I know there are other programs out there to help novelists and writers of all types. Do you use any and if so, what do you like or not like about them? And if you try yWriter, please come back and let me know what you thought of it! You can find it at: http://www.spacejock.com/yWriter5.html

Now, off to hug my husband instead of my monitor…

Author’s Note: Simon Haynes and Spacejock have no idea who I am or that I even exist. He (they) did not ask me for a review of this product. I did it because I love it and want to share it with others who may find it awesome or at least useful. I’m not being compensated in any way for my opinion.

Photo Credits: The images in this post are screen shots of my computer/work. I own the copyright to the images and the written content in them. I ask that they not be reproduced in any way, shape or form. Thanks!

3 Key Features of Tablet PCs

This week’s post is a “guest post” of sorts. This appears in  ComputerGeeks2Go’s “How to Choose a New Computer” series and they’ve graciously given me permission to reprint it here in it’s entirety. To learn more about choosing computers, website design and hosting, visit their website at www.computergeeks2go.com.

Congratulations on your decision to buy a new Tablet PC. With so many choices out there, here are the three most important features to keep in mind as you choose.

Key Feature 1 – Operating System

Google and Apple are the prime players in the mobile operating world, though Microsoft and Blackberry each have a finger in the pie as well. Here, we’re going to break down what each company’s operating system offers you.

Google’s Android

Android first made its splash in the mobile phone market and now you’ll find that little green powerhouse on the Transformer Prime, the Samsung Galaxy Tab, the Acer Iconia a500 and more.

Google designed the Android software specifically for mobile devices (smart phones, tablets, netbooks, etc.) and some of the features that come with the latest version of the OS are:

  • Everything “Google” (Gmail, GoogleTalk, YouTube) is already included on the tablet and since you have to create a (free) Gmail account to set up your tablet, it’s all at your fingertips the moment you first turn it on.
  • Multi-tasking made simple – use the “Recent Apps” button to quickly switch back and forth between tasks.
  • Speaking of Apps, check out the “Marketplace” and download everything from games to books to productivity software.
  • Group shortcuts – have shortcuts to 5 different cookbook apps? Instead of taking up screen space, “stack” them on one another in their own group.
  • Powerful web browsing

Apple’s iOS

Originally Apple’s iPhone operating system, iOS now runs on all of Apple’s products, including the iPad. With iOS you get:

  • A mega app store
  • Easy integration with all of Apple’s other products
  • Parental control – control your children’s access to your iPad
  • Wireless sync to your Mac or PC
  • Multi-tasking
  • Enhanced Accessibility

Microsoft’s Windows OS

Windows has been a household name since the ‘80’s and you now find it on tablets such as Lenovo’s IdeaPad and Archos 9. Some of the features inherent in the Windows Tablet are:

  • User-Friendly Interface – If you have a home or work PC, you’re already familiar with what it looks like.
  • Adobe Flash support
  • Easy multi-tasking
  • Compatible with a range of software

Blackberry

Blackberry’s been synonymous with “Corporate mobility” for a long time and now you can find it on Blackberry tablets like the PlayBook. And while the other three companies seem to market their tablets to the masses, Blackberry seems content to keep its focus on the corporate market. In that respect, their operating system includes:

  • Powerhouse multi-tasking – according to Blackberry’s website, you can run your apps simultaneously
  • Jump quickly from one open application to the next
  • Mac and PC sync – though you have to run an installer to enable sync between your Blackberry tablet and Mac or PC
  • Documents to Go – view and edit your Microsoft Office Suite documents
  • Blackberry App store

Key Feature 2 – Storage

After deciding which operating system to go with, the next big decision is how much storage space do you need? Tablets come with anywhere from 8GB to 64GB of on-board storage space. The more applications, videos, pictures, etc. you store on your tablet, the more storage space you need.

With that being said, most of the tablets have slots for external SD cards (Secure Digital [SD] memory card) and are compatible with many cloud storage solutions. So you can save some money by buying a tablet with less on-board storage and using the cloud.

Key Feature 3 – Screen Size and Weight

Today’s tablets range in (screen) size from 7 inches to 12 inches and can handle screen resolutions of 800 x 600 pixels to 1280 x 800 pixels. Most tablets weigh less than a pound, making them extremely portable. The smaller tablets are nearly pocket-sized.

Let us help

If you’re not sure which tablet to buy, call us at email us at sales@computergeeks2go.com. We’ll be happy to help you choose the right tablet for you.

Related Articles

As you can see in the bottom, right corner of my site, ComputerGeeks2Go is my host. They didn’t come to me to post this on their behalf. I asked if I could.